This is the third step up the RAHI ladder of expense, and this is where things start getting interesting. But before I get into the review, lets get the errors out of the way:
1. The first thing you’ll probably notice is that the bags don’t match the instruction book. You will need bags 1 and 2 to make the teal model and bags 3 and 4 to make the blue model. The instruction booklets have them shown the other way around, and since there are a number of different pieces, it will make a big difference.
2. In the teal model booklet, on pages 9 and 19, they show a ‘1:1’ picture of a piece of grey piping that resembles a crinkle-cut french fry. The pictures are wrong. On those pages you will need the longer pieces of piping. On pages 14 and 24, the ‘1:1’ pictures are correct. The blue model does not have this error in the instruction booklet. I didn’t build the larger model, but it looks like the ‘1:1’ pictures of the grey piping are all correct in that section as well.
3. When you are done building each model, your small collection of leftover parts should include one half-bushing each. If you don’t know what those are, in the teal instruction book, on page 5, in step 13, there are four grey pieces that go on the plus-rod on either side of the big green wheel. The two larger ones with one round end and one divoted end are full-bushings, and the two smaller ones are the half-bushings that I’m talking about. If you can dig up two more half-bushings, there is a small tweak that you might want to make. Right next to the tank tread are two mounting points for the black ends of the colored shock-absorbers. Put one half-bushing on each of these mounting points to help hold the shock-absorber on the post.
4. If you can dig up one more half-bushing somewhere else, it’s not a bad idea to put one directly under the white TOA head on the blue model. If you don’t the head will keep lifting when the lower jaw is smacked.
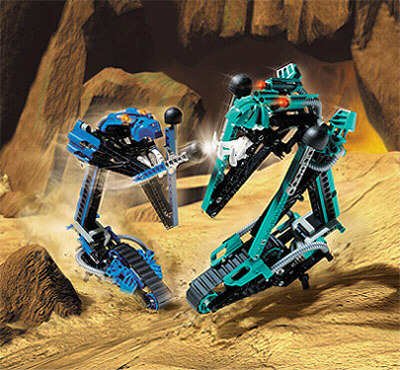
Okay, on to the fun stuff. When I was in grade school, a guy who rode the same bus to school had this little football player puppet that had a stick and two levers hidden under the jersey. If you held the stick and pushed the levers, he would punch with the corresponding fists. This is exactly what the attack mechanism of the TARAKAVA seems to be based on, though the lever mechanism looks like it is arranged in a slightly different configuration. Anyways, these guys may look a bit awkward, especially with single tank treads instead of legs, but they are fun to play with. There is a shock-absorber arrangement that allows the TARAKAVA to lean forward and thus punch lower. If you push it all the way forward, it will punch low enough to clip the top of the MASKS on WHENUA or any of the TOHUNGA. If you let them stand straight up, they actually punch higher than their own faces, so they can take on pretty much anything there is except the MANAS, whose MASKS are too low, and a creatively aimed NUI-RAMA. Well, that is, if you insist on keeping the tread firmly on the fighting surface. The heads have a rather interesting mechanism that allows the mouth to be smacked out of alignment with the rest of the face. If you hit it just right, the MASK will tip down to a 45 degree angle that leaves it dangerously exposed. Unlike with the MANAS, this doesn’t actually disable the model, but you can always pretend that it knocks the TARAKAVA out without actually removing MAKUTA’s influence. There are also kickstands that can be lowered to keep the models standing without hand support, or lifted out of the way so they don’t scrape when you’re ‘driving’ the TARAKAVA around on its tread.
Unlike the NUI-RAMA, who only had different probosci, and the NUI-JAGA, who had no different pieces at all, the TARAKAVA have a number of differences. On the tread section, the blue one has TOA feet while the teal one has the smallest wing-shaped race-car panels. The grey piping is also attached differently. Moving to the arms, the shoulders on the teal one use teal TOA feet and short grey piping while the blue one has the medium sized wing-shaped race-car panels. The heads are vastly different, using a lot of the same parts but in different configurations, and a few different parts as well. The head differences that most people will care about are the mouths. The blue one has GALI’s PAKARI MASK, which makes for two MASKS that can be either INFECTED or not depending on who is wearing them. (The purple NUI-JAGA and ONEPU, the McD’s TOHUNGA from ONU-KORO both have purple PAKARI MASKS.) The teal one has a teal KAKAMA, which is unique to this set. The blue one also has two GALI hooks for its lower jaw, while the teal one has a single ONUA claw serving the same purpose. I find that I like the teal color better for a lizard, and while the blue model has a more appealing design for most of its body, the teal mouth chunk looks cooler. The GALI hooks would look cool as cobra-like fangs on the upper jaw, but they look a bit cumbersome on the lower jaw. Additionally, the KAKAMA eyes look very nice as nostrils, though the teal model’s head already has two large tubes that would also seem to serve that purpose. Oddly, both MASKS look better below the blue model’s upper head section.
1 Comments
Did you get this picture from the 2001 web kit?